Sunday, August 30, 2009

Windows 7 Useful Utilities

After playing with Windows 7 there are a number of programs i have found invaluable in filling a few small gaps that Windows has missed:

  • Wireless Autoswitch – This great utility disabled the wireless card whenever an Ethernet cable is plugged in.  This saves power and ensures there is only one connect to your LAN, which means you will not accidentally be transferring gigabytes of data over your wireless connection, which is inevitably 10x slower.  Cost = $AU10
  • BlueSoleil BT stack – This is the best BT stack i have come across, officially supports Windows 7, is updated on a regular basis and best of all can be purchased and used on your system for a wide range of BT modules.  Cost = $AU35
  • Winrar – DUH, best compression utility out there.  Cost = FREE (with reminder)
  • Virtual Clone Drive – This lets you mount disc images and use them like a CD/DVD has been inserted.  I used to use Daemon Tools but at this point in time the Lite version does not support Windows 7.  This utility supports Windows 7, integrates into explorer (ie - double click images to mount) and is free.  Plus, if you enable virtual sheep, you get a cute sheep as your disc icon …  Cost = FREE
  • Live Writer – I have a new found love for this simple app.  Im sure there is better out there but this does everything i need.  I can simply paste an image from the clipboard and it uploads it for me – man i cant believe i EVER used the Blogger editor …  Cost = FREE
  • SpeedFan – This great little utility reads the hardware sensors in your computer.  In particular i used it to monitor the temperature of my CPUs while initially playing around with Windows 7 because I had heard that under Windows 7 the MBP ran hot.  I have found this to be completely false with the CPUs never moving from 40C during normally daily operation.  Obviously while playing games the temperature can get higher but nothing to worry about.  It also picked up my GPU and hard drive temperatures.  I recommend changing the system tray font to white and large to make it fit nicely with the Windows 7 look and feel.  Cost = FREE

Ill post more as i think of them.  For now sleep time …

Macbook Pro Unibody iSight Working

OK this post is going to fall into the ‘what the’ category.  I just reinstalled Windows 7 Enterprise 64-bit on my MBPU and the iSight webcam is working inside Messenger!  This is strange since last time the webcam worked in Windows but not inside Messenger.  The only difference is that i installed Enterprise this time instead of RC but i cant see why that would make a huge difference as it is the same version of Messenger, which seems to be where the issue lies.

I will investigate further and keep you posted but the main reason i wrote this post is to point out an excellent utility i found for testing your webcam.  Its very small and simple but provides a large range of useful information.  The utility is called Webcam Diagnostic Assistant and it helped me to work out when i was using RC that the webcam was indeed working under Windows, but not inside Messenger.

Live Writer + Blogger = 403 Error

The editor that comes with Blogger is SHITTTTT so i decided to give the Live Writer tool that comes with Windows Live Experience pack a go. In a word – brilliant, except for one small error – when you try to publish a post with an embedded image you can get a 403 error, as i discovered when publishing my last post. This is easily fixed by logging into your associated Picassa account, after which Live Writer is able to publish the embedded image just fine. Kudos to this guy’s post for succinctly steering me in the right direction

Live Messenger And The Default Communications Device

Discovered something else totally cool about Windows 7 (and probably Vista though i havnt tried it on there).  For audio playback devices there are two default settings:

  • Set as default device - Audio from all programs will be played through this audio device unless otherwise configured
  • Set as default communications device - All calls and video call audio will be played through this audio device unless otherwise directed

Turns out that messenger falls into the second category.  If you make a video call or voice call through messenger it will direct to the default communications device not the default playback device.  What this means, if you are using bluetooth headphones or similar, is that the sound will still go to the speakers unless you configure it to use your headphones.  Doing this is very easy:

  1. Shut down messenger if it is running
  2. Connect your bluetooth headphones or plug in your wired headphones
  3. Right-click the speaker icon in the system tray and select Playback devices to display the following dialog:image
  4. You will see the top item is my bluetooth headphones – they are currently set as the default playback device automatically when connected by the BlueSoleil software i am using
  5. Right-click the bluetooth/wired headphones and select Set as default communication device.  This will cause all communication audio (ie - Live Messenger calls) to redirect through the headphones when they are connected
  6. Click OK to save the changes
  7. Restart messenger and make a call.  The audio will now go through your headphones

Note that it is necessary to restart Messenger for these changes to take effect.  If Messenger is running and you make the change it will continue to use the speakers until you do so.

Friday, August 28, 2009

Using BlueSoleil With Macbook Pro Unibody

In my last post i showed how to use the Toshiba BT stack with the 15" Macbook Pro Unibody (and probably any other BT device you would like). I wasnt too happy with the outcome though - i find the Toshiba BT stack to be quite clunky in the way it integrates with my BT hardware and has a very dated feel to the software. On the plus side it was nice and configurable which i do like. The BIGGER downside though, is that there seems to be no option to license the software on non-Toshiba hardware, rendering it useless after 30 days, unless you crack it. As a software developer myself i try to avoid the latter option and support the industry :)

With that in mind i set my sights back on the other two options - Broadcom and BlueSoleil. My first choice was Broadcom, only because the MBP Unibody uses a Broadcom manufactured module. However Broadcom plainly refuses to install itself on any device that has not paid them royalties for the BT stack, which Apple obviously has little incentive to do at this time. So i turned my attention back to BlueSoleil. This was always my first choice to begin with, since it is intended as an all-purpose stack that you CAN buy a license for if you like it. Well i was successful this time around and i can tell you, the effort was definitely worth it.

Installing BlueSoleil On An Unsupported Device
  1. Download the latest BlueSoleil release from here (version 6.4.275.0 was used for this writeup)
  2. Extract the contents of the zip file and browse to the install directory
  3. Open setup.ini for editing using notepad or similar and replace the contents with the following (simplified for ease of reading). Note that while some of these changes may not strictly be necessary, they streamline some parts of the install process and avoid problems later:

    [bsconfig]
    BluetoothPlaceSite=1
    ShutDownBluetoothHardwarePower=1
    DefaultLocalDeviceClass=1

    [Install]
    CmdLine=""%SetupExeLocation%%PROCESSOR_ARCHITECTURE%\setup.exe"
    [SPDPhoneNumber]
    NumberCount=1
    SPNumber1=#777

  4. Save the file and close it
  5. Run setup.exe as administrator (this is probably not necessary, but its what i did to achieve a successful installation so vary and post your results below)
  6. The installation should succeed with no errors. You should notice the default MS BT stack icon in the system tray has disappeared. Do NOT restart your system when prompted - we want to make a few changes first
  7. Open file explorer and browse to where you installed the BlueSoleil BT stack (default is C:\Program Files\IVT Corporation\BlueSoleil)
  8. Open the bttl.ini file for editing in notepad or similar. Search for the text 8203. The line that is found should be in a section titled [HW356]. If you are using a different version of the drivers then it is unimportant if this title is different. What is important is that you take note of the title. Change the text 8203 to 8213 - what we are doing here is changing the hardware ID specified in this section to match the hardware ID of the BT module. If your hardware ID is slightly different, then simply change the hardware ID here to match yours (and in all subsequent steps). See my previous post on how to locate your hardware ID if you are unsure
  9. At the top of the file, in the [DEFAULT] section, change the setting NUM=363 (number may differ depending on your version of the drivers) to NUM=356
  10. Save the file and close it. Depending on your security settings in Windows 7, you may not be able to save the file directly. Instead - you may have to save the file to your desktop or some other location, close the file and then manually move it back into the directory
  11. Go to the driver\usb subdirectory and open the file btcusb.inf for editing.
  12. Search for the text 8203 and replace all instances (there should be two) with 8213 (again substitute for your hardware ID if it is different from mine)
  13. Save the file (again you may need to indirectly save it using the method explained above) and close it
  14. Restart your computer and once it has restarted, you should see the new BlueSoleil icon in the taskbar. At this point BlueSoleil is installed successfully, but the BT module is not yet setup. We need to do that manually through the device manager
  15. Go to the start menu, type "device manager" and press enter to open the device manager
  16. Browse to the BT module under Bluetooth - it will likely be called Generic Bluetooth Device (if not you may have some other BT software installed that should be removed before any of these steps are performed, but you can probably just install it at this point and proceed)
  17. Right-click the BT device and select Update Driver Software
  18. Select the bottom option Browse my computer for driver software
  19. Select Let me pick from a list of device drivers on my computer and browse to the location of the USB BT driver modified above (default is C:\Program Files\IVT Corporation\BlueSoleil\driver\usb) and click Next
  20. Select the only option in the list, which will be Apple Built-in Bluetooth
  21. A warning will pop up saying the driver is unsigned - click Install this driver anyway
  22. The device should now change its description in Device Manager to Apple Built-in Bluetooth and is successfully installed!
  23. Right-click the BlueSoleil icon in the taskbar and select Turn on bluetooth. You should now successfully be able to pair your bluetooth devices (eg headphones) with your MBP Unibody!

My Experience With BlueSoleil

  • A2DP connectivity is ABSOLUTELY seamless - I made my headphones discoverable - BAM they were connected and appeared as connected on the computer. No redundant password prompt or connection dialog. Music instantly started playing through them. Turn them off and sound changes back to the speakers. Turn them back on they start playing again. Absolutely seamless - i dont even have to stop/start the program using the audio device at the time, which i had to do with the Toshiba drivers
  • Beautiful icon set - the icons used are all vector graphics and fit very nicely with the slick look of Windows 7
  • Minimal set of services - only 3 which is not as good as the MS stack, but way better than the Toshiba drivers which had around half a dozen! They seem to be well designed, making efficient use of resources too which is important - BT should be very transparent to the system in my opinion

As requested, here are the modified INF files (generated from version 6.4.286.0 on 2/12/2009)

Wednesday, August 26, 2009

Bluetooth Stereo Audio (A2DP) Fixed on Macbook Pro Unibody

Well after 3 solid days of searching, downloading and modifying the various Bluetooth (BT) stacks out there, ive finally been successful in getting my Logitech Freepulse Wireless Headphones to work with my MBP 15" Unibody. Its worth it since i spend 1.5 hours each day travelling on the train, so this really comes in handy. Let me walk you through my experiences (so you can see what didnt work) and finally the resolution that did work.

What I have tried
The following list i have tried over the past few days without success:
  • Uninstalled Windows 7 64-bit and reinstalled 32-bit. See my previous post on the main reasons i did this, but it was also to see if the 32-bit drivers were any different from the 64-bit counterparts - they weren't and the same problems were still evident. My next step will be to revert to 64-bit again to reclaim my memory
  • Discovered that the MS BT stack is extensible, though documentation is so far sketchy at best. Contemplate writing an A2DP profile extension that would provide all Windows users with full A2DP support. I havnt completely disregarded this yet but it looks like it will be significant work to fully support all types of encoding, etc. This idea has been shelved pending my future experiences with the BT stack i now have working
  • Tried to use the seemingly excellent BlueSoleil BT stack 6.4.275. This doesnt support my current adapter out of the box, but using similar techniques to what i describe here, i was able to get it to install. Mixed experiences with this one - the first time after installing i managed to get the BT service to start but could not connect. Subsequently i was never able to get the service to start again - it would always freeze - and i mean FREEZE as in the computer was responsive but hung whenever i tried to shut it down or uninstall BlueSoleil. This did not give me a warm, fuzzy feeling at all. They seem to update frequently though and it does officially support Windows 7 now as well as several, older Apple BT modules so i will definitely try it again once they officially support my hardware
  • Tried to use the Broadcomm BT stack 6.3.0.200. Again, my hardware is not officially supported and this was made trickier by the fact that the installer seems to only be a stub that then downloads the components it detects as necessary. I didnt play around with this one too much and i will be revisiting it now that i have had some success
  • Tried to use the Broadcomm BT stack 6.0.1.5300. I found the full package of this version so i decided to give it a go. After tweaking the INF files i had no success in getting the installer to identify my BT module. This is a problem because if the Broadcomm package can not detect your module, it refuses to install at all, preventing further tweaking. I will likely focus on a later release of Broadcomm anyway
What worked
I ended up having success with the Toshiba BT stack 6.40.02. You can download the latest 32-bit and 64-bit versions from here. Again, the current version of the driver does not support my hardware out of the box, so use the following steps to get it to install:
  1. Extract the contents of the downloaded zip, which will result in another self-extracting executable called v64002T_20090623_x32.exe

  2. Extract the contents of this executable using a suitable program (my persontal favourite is Winrar, but 7-zip should also do it)

  3. Run the silent_install.bat batch file - this will perform a silent installation of the BT stack, so you wont see much on screen except probably a UAC confirmation (if you have it turned on) to confirm the operation. Doing this is better than running the installer normally, since if you do that, it tries to install the BT module as part of the installation. However that will fail because the INF file does not support the current hardware yet

  4. After the silent install has completed, browse to C:\Program File\Toshiba\Bluetooth Toshiba Stack\Drivers\tosrfusb and open the tosrfusb.inf file for editing

  5. Search for [Standard] to go directly to this section. You will see a bunch of entries with the following format:

    %DisplayName%=Section, HardwareID

    We need to add another entry for the BT module in our MBP. Add a new line at the top of the list that looks like this:

    %Apple.DeviceDesc%=TosrfUsb_Device, USB\VID_05AC&PID_8213

    If your Hardware ID for your BT module is different, simply subsititute it for the above. The process to find your hardware ID is outlined below.

  6. You now need to add a description of your BT module to the INF file. Go right to the bottom of the file and you will see a bunch of declarations with the following format:

    Key = "Description"

    We need to add another entry for the BT module in our MBP. Add a new line at the bottom of the list that looks like this:

    Apple.DeviceDesc = "Apple Built-in Bluetooth Module"

    You can actually make the text inside the quotes whatever you want - this is what will appear in the Device Manager for the device

  7. Save the INF file - under Windows 7, depending on your security settings you may be unable to save the file directly since this is a protected location. The easiest way around this is to either edit the file as administrator or save the file to the desktop, then move it back to the folder overwriting the old file

  8. Press the Windows key to open the start menu and type 'Bluetooth Settings' then press enter to start the Toshiba BT manager. This will trigger the Toshiba BT manager to go and discover the BT module in your MBP. With the settings added to the INF above, it should install the necessary drivers, set up the required service as well as shut down the standard MS stack for you. You may be required to restart your computer after this step.

  9. At this point the Toshiba BT stack is installed and ready to use. You can now right click the new BT icon in the system tray and pair with your BT devices


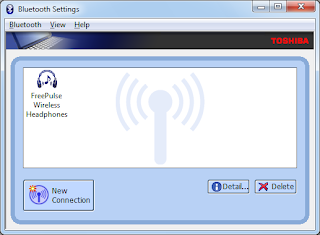
  10. I have discovered a small glitch with my Logitech Freepulse Wireless Headphones when using the Toshiba BT stack. Everytime i pair the headphones it prompts me for the password (0000). If i connect this way (ie headphones initiated the connection) i find the sound does not work at all! However if i initiate the connection from the computer, it pairs without asking for the password and the sound works flawlessly.

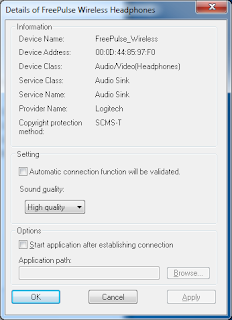
  11. By default stereo headphones are set to use low quality with the Toshiba BT stack. To change this, right click the heaphones icon in the Toshiba BT manager and select Detail. Change the Sound Quality setting to High Quality and click OK. Note you will have to reconnect your headphones for this setting to take effect if they are already connected

The only downside to using the Toshiba BT stack is that because this is a non Toshiba piece of hardware, the BT stack only runs for 30 days. I dont believe there is an option to purchase this stack either, unlike the BlueSoleil option. I will leave that limitation as an exercise for you to overcome. I will just say that there are options out there to overcome it.

Works On My Machine!
Please note that this should work on every single MBP 15" Unibody, since they are all the same hardware! However there is always a chance Apple will start using a different BT module in the near future. My machine identifier is MacbookPro5,4 (which can be found using the System Information tool that comes with Windows under the System Model field). The details of my BT module are as follows:

Manufacturer: Broadcom
Firmware Version: 162 (251)
Hardware ID: USB\VID_05AC&PID_8213
HCI Version: 2.1 ($4)
HCI Revision: 251 ($FB)
LMP Version: 2.1 ($4)
LMP Revision: 8610 ($21A2)
Composite Class of Device: 3670284 ($38010C)
Device Class (Major): 1 ($1)
Device Class (Minor): 3 ($3)
Service Class: 448 ($1C0)
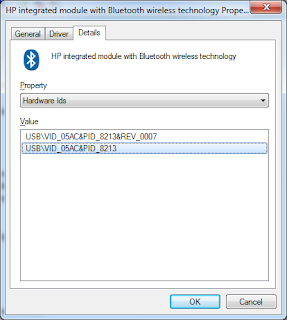
Finding Your BT Module Hardware ID
The hardware ID is what is used inside the INF file to uniquely identify a particular configuration of hardware. To find your hardware ID, use the following steps. If it is not the same as mine above then substitute it at the appropriate points in the above steps and it should work. Please post your experiences in the comments!
  1. Go to the start menu and type "Device Manager" then hit enter to open the device manager.

  2. Browse to the Bluetooth section and expand it

  3. Double-click the Generic bluetooth device to open the properties (the name may be different if you have already installed a BT stack - eg Apple Built-in Bluetooth Module if you followed the above steps already)

  4. Go to the details tab

  5. Change the Property list to Hardware Ids

  6. The ID you are after will have the format USB\VID_xxxx&PID_yyyy

Troubleshooting
If it doesnt work, i would suggest looking at the following:
  • Uninstall any other BT stacks you have installed - this includes Widcomm, Broadcom, Toshiba and BlueSoleil. The standard MS stack will always be there but all the other packages seem to now handle it fine and perform the necessary steps to disable it as required
  • Try preventing the MS stack from detecting and installing its drivers by removing the bth.inf and bth.pnf files from C:\Windows\inf (back them up of course). This really shouldnt be necessary though and i have never had to do it with Windows 7
  • Try stopping the Bluetooth Discovery Service
  • Usual stuff like restarting, checking your device ID, etc
  • Pray to the BT gods ...
Final Words
I really, really wish MS would just include the A2DP profile in their built-in MS stack. To be honest i much prefer the built in stack over all the other implementations - it is much simpler, has better icons, integrates better into the various features of Windows 7 and seems to have a lot less services and processes needing to be run. It would be a simple DLL addition to provide the support and is something that OSX now provides out of the box since 10.5. I really cant believe in this day and age they are going to release Windows 7 without it, but this seems to be a reality that we have to work around.

Monday, August 24, 2009

Getting Around The 4 Partition Limit With Just The Windows 7 Bootdisk

In this post i talked about how i ran out of partitions when trying to create my Data partition after using the recommended Windows 7 install configuration on my MBP. Well tonight I finally decided to blow away my 64-bit RC build of Windows 7 and replace it with a 64-bit RTM build after i found out i can run it for 120 days without entering a valid key. I figure this is long enough for me to get a valid license after its released that i shouldnt have to install again. Then again, if the 64-bit RTM version doesnt fix all the driver issues im having (and i see no reason why it should) then i might roll back to the 32-bit RTM version just to see if its any better - stay tuned.

Still when it came time for me to do this i realised that i didnt have a bootable partition utility handy (TODO: i need to find out which Linux boot disk utility to use for next time). However i worked out you can force Windows 7 to install on just a single partition using only the basic and very limited parition tool that comes with the Windows 7 installer. I found the method i used amusing - it reminded me of those classic maths puzzles where you have to end up with Y litres of water using only a 3L and 5L jug.
  1. Boot into OSX - Use Boot Camp Assistant to remove the existing RC Windows 7 partition and its associated 200Mb boot partition, so that there is only the OSX parititon and its 200Mb boot parition remaining.
  2. Restart Boot Camp Assistant to resize the OSX partition right down (i used the minimum of 25Gb) and assign the rest to Windows
  3. Restart using the 64-bit RTM boot disk and go to the partition utility (Advanced)
  4. Delete the Boot Camp partition to leave the OSX boot, OSX main and unallocated space
  5. Create a new paritition in the unallocated space. Windows 7 will automatically create the 100Mb boot partition.
  6. Delete the Windows 7 boot partition so there is 100Mb unallocated space
  7. Create a new partition in the 100Mb unallocated space
  8. Delete the larger, older Windows 7 main partition
  9. Extend the 100Mb NTFS partition to whatever size you want your Windows OS & programs partition to be (i used 100Gb)
  10. Create a new partition in the remaining unallocated space (mine was 172Gb)

This left me with the desired 4 partitions:

  1. OSX boot - 200Mb
  2. OSX main - 25.9Gb
  3. Windows main - 100.1Gb
  4. Data - 171.9Gb
The windows recovery files are then placed in \Recovery on the Windows main drive

Wednesday, August 19, 2009

Windows 7, BootCamp and Trackpad Scrolling

A lot of people seem to be having issues with the trackpad driver when running Windows 7 on a Macbook Pro using BootCamp. My experience is that if you use the BootCamp 2.1 drivers the touchpad works pretty well - 2 finger scrolling, 2 finger right click - all that works great. The only issue is that 2 finger scrolling is way to fast.

What a lot of people dont seem to realise is that once the trackpad driver is setup, you can use the standard mouse control panel to change the properties of the 2 finger scrolling. It seems that the driver is incredibly basic - simply generating linear scroll-wheel events when 2 fingers are dragged up or down. By default, Windows scrolls 3 lines for each mouse-wheel 'click'. Since the 2 finger scrolling generates quite a lot of scroll-wheel events, i recommend reducing this to 1 line for each 'click'. You can do this by pressing the windows key, typing mouse and pressing enter to go into the mouse control panel. On the Scroll tab you can change the setting under the Vertical Scrolling section.


The result is a nice experience overall - a very smooth scrolling action when using 2 fingers. If you need to move more quickly up and down, page-up/page-down (Fn+Up/Down) will do that.

Tuesday, August 18, 2009

OSX / Windows 7 Multi-Boot Partition Limitation

In my new MBPU 15" that i have been writing a lot about lately, i have OSX and Windows 7 partitions so i can boot into either. After all, OSX has some nice software i still like to use. I came across an interesting issue with this setup last night though. My standard setup on a system is to have 2 partitions - one for the OS and progs and one for the data. This allows all documents, email, movies, pics, music, etc to be kept on a seperate partition. Then i 'ghost' my OS drive and refresh the image every few months once a substantial number of updates come out. This means if anything happens to my OS or i need to refresh it, it only takes me 20 minutes to be up and running again.

Unfortunately this is not possible on my MBP using the current configuration. Reason is that both OSX and Windows 7 prefer to have a seperate partition for their boot files. This link explains the advantages of such an approach. This requires a seperate partition of around 100-200Mb for each OS, meaning that i have the following partitions:

1) OSX boot
2) OSX
3) Windows 7 boot
4) Windows 7

When i tried to use my free space to create another parition for my data, using the excellent free Paritition Wizard utility (which supports Windows 7), i found i was unable. Apparently there can only be 4 primary partitions on a physical disk! As we can see, i already have 4 partitions.

It seems there are are ways to get Windows 7 to avoid creating the seperate boot drive - i need to carefully study the disadvantages of this before i make the switch. The article above points out most of these disadvantages but most of them dont really concern me. Although it may be a better way of handling the boot files, it makes no sense to have all my data on one parititon so i will likely end up canning this partition and reinstalling

Windows 7 on Macbook Pro Unibody - ACPI Support is Screwed

So Windows 7 has some great new power management features, like idle timeout screen dimming and such - see here for excellent information outlining the available power management features and how they can be used.

Unfortunately it seems again the Apple have not provided drivers to fully support the ACPI specification that allows a lot of these features to work. I suspect this is a large part of why i only get 4 hours of battery life under Windows 7 when i get around 7-8 under OSX.

You can start to get a picture of what is not supported by running the new powercfg command-line utility with the argument -energy. This runs a 60 second test to profile how the system is using power. Doing this on my MBPU 15" showed the following issues:
  • USB Suspend:USB Device not Entering Suspend - None of my USB devices are supporting being suspended, which means they are unnecessarily always on. This is probably not a huge concern but sucks considering my power profile says to suspend all USB devices when not in use
  • CPU Utilization:Processor utilization is high - When you run this test you are supposed to shut down all applications, etc to get a realistic perspective of your idle computer power usage. My results showed my idle CPU usage was fairly high (4.92%!) which will consume power. Guess what the culprit was? - yep KbdMgr.exe, the Apple BootCamp application that allows keyboard shortcuts, etc to work - this is constantly using 2% CPU! An indication that this app should be seriously profiled and optimised
  • Platform Power Management Capabilities:Adaptive Display Brightness Support - This is by far the biggest concern for me, as it means that the display cannot be automatically dimmed and controlled depending on the power profile is set. I suspect this is due to ACPI not being properly supported by the provided drivers

To confirm the suspicions with ACPI support, i turned to the excellent Notebook Hardware Control utility. This tool allows a driver to be written in C# (my language of choice!) for a specific hardware configuration (notebook). After mucking around for many, many hours i managed to work out how to dump my ACPI SDST file from the registry and decompile it into ACPI ASL (ill describe this process in another post), which is a descriptive language that shows what ACPI features are supported on my notebook. Ive yet to master what this file is exactly trying to tell me, but initial findings to seem to indicate that the required screen brightness entries (as defined in the official ACPI specification) are not available, which is why Windows is unable to control the screen brightness.

Now if i understand what i am reading correctly, i can actualy modify the ASL, recompile it and enable these features. I know they are available hardware-wise because OSX is able to dim the screen after 30 seconds. I also know Windows 7 supports this out of the box, so the only remaining step is the SDST definition being correct!

I originally thought that i would not bother with this since surely Apple will fix it when Windows 7 is released right? Hmm after seeing the amount of time it is taking them to fix their touchpad, sound, video, bluetooth, etc drivers im not so sure.

Windows 7 on Macbook Pro Unibody - Sound Driver Issue Resolved

Turns out that Apple did some strange things in the driver INF file that caused the speakers to be dampened and the headphones to be amplified, as well as forgetting to enable 1/3 speakers.

To resolve this issue, download the fixed drivers here

Thats one issue ticked off the list.

MSN Connection Issue (Error code 0x80072efd) Resolution

My brother made an interesting discovery tonight. His copy of MSN could not connect to the server and came up with the EXTREMELY generic error "Could not connect you to MSN blah blah ... Error code 0x80072efd". Googling this error is completely useless because its the kind of error that 1 million noobs encounter and post solutions like "is your firewall off" ... that kind of thing. Turns out the issue in his case was very simple - the date on the computer was set to December last year. Once this was changed to the correct date/time, MSN connected fine! We changed it back to a dodgy date just to verify that this is indeed what fixed the issue.

Seems that Live Messenger does not let you connect unless the date/time is somewhat sane, which is perfectly acceptable. What is not acceptable is the terrible error message.

Windows 7 on Macbook Pro Unibody - Driver Issues

Ill be writing a lot about this combination of OS and laptop - considering i just bought myself a nice new 15" Macbook Pro Unibody with the intention of using Windows 7 as my primary OS. Im running the RC version at the moment and its running pretty nice. Damn nice in fact - but there are a few driver issues, which is totally due to the sad state of BootCamp at the moment. Out of the box i have these issues:

- Bluetooth driver 'isntalled' but device manager reports it is still using the MS driver
- iSight driver is the same issue
- Nvidia driver did not install
- ACPI support is abissmal
- Speaker sound volume is very low
- Sound does not switch to headphones when plugged in

Ill be addressing these issues as i fix them or try to fix them. If anyone has any tips let me know